3,528 photos
This is the situation: you’ve just come back from a fantastic trip, had the time of your life, and now… your camera’s memory card is loaded with thousands of photos.
So, now what?
Most people can’t be bothered to sit down and clean up, organize, and edit those thousands of images (not me, but I’m weird). Many just leave the card in the camera or, at best, dump the files onto a hard drive, waiting for that mythical day when they’ll have the time and energy. And that’s where the photos stay, forgotten and gathering digital dust.
The same goes for phone pictures. Just take a look at your gallery: how many images are sitting in there? Exactly.
In this article, I’m going to share my personal photo editing workflow—something I’ve built over time, and that is (really) very simple. It’s neither the only way nor the best way: it’s just what I do. Ideally, you’ll pick out the parts that work for you and adapt them to your own process.
A few things first
First, let’s define terms. I’ll be using “editing” in a very specific sense: selecting, organizing, and filtering. When I talk about retouching or enhancing images with software, I’ll use the word “post-production”. We usually call everything “editing”, and that’s fine, but here I want to separate those two stages. Because while some photographers never do post-production (either by choice or lack of knowledge), everyone needs to edit their photo archive—that is, separate the wheat (the good shots) from the chaff (the bad ones).
Second, and this should be obvious but usually isn’t: back up your photos. While you’re traveling and again when you get home. Maybe you think it’s unnecessary because you’ve never had a memory card fail, but that only means it hasn’t happened to you YET. Or you haven’t lost one. A friend of mine once left her case full of cards on a plane and never saw it again. These are the things you think will never happen… until they do. And on that day, you’ll wish you’d listened to me. I’ll write a dedicated article about backups, because the topic deserves one.
Third: it’s essential to create a logical folder structure to organize your photo archive. By “logical,” I mean one that allows you to quickly find the photos from a particular project. Since I mainly shoot travel photography, what works best for me is naming folders like this: <year>.<month> <place>. But if organizing by date doesn’t work for you, find a system that does. And please, stick with it. Don’t change your mind halfway through, or you’ll regret it later.
One more thing: a real editing workflow requires more than just putting your files into Windows or Mac folders. You need a photo manager that lets you tag and label your images to help with the process. Programs like Lightroom (or “LR,” the one I use and will reference throughout), Capture One, or Darktable include this functionality alongside their editing tools. But if you just want a manager because you don’t do post-production, there are options like Bridge (also part of the Adobe Suite), Digikam (free) or Photo Mechanic (paid).
I’ve named my method “How do you eat a cow?”. This name comes from a professor I once had, who greeted us on the very first day of class by asking this unexpected question.
Answer: “One piece at a time”.
I could have named my method “Divide and Conquer”, since that’s basically what it is—breaking down thousands of photos into smaller, manageable sets—but honestly, “the cow method” sounds catchier, don’t you think? I do.
Step 1: Import the photos into your manager
This will vary a bit depending on your software. If using Bridge, all you need is drag the folder with the files to it. In LR, you use the Library module, selecting your source (I import directly from the camera or memory card, which copies files to the hard drive and loads them into LR in one go) and your destination. Capture One’s process is very similar.
Step 2: Quick review and reject the failures
Next, I quickly go through the photos one by one and mark as rejected the obvious failures (blurry, camera shake, accidental shots, blown highlights, crushed blacks… unrecoverable mistakes) or duplicates. In LR, just hit the X key on those “nope-nope” shots, and you’ll finish this first cleanup in minutes.
Pro tip 1: In LR, enable Photo → Auto Advance so the program automatically jumps to the next image as soon as you hit X.
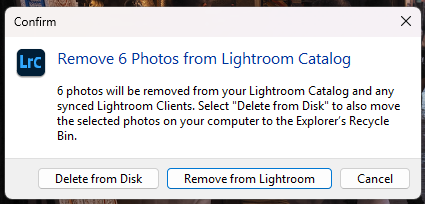
Pro tip 2: When I finish this step, I remove those rejected images from the LR catalog since I don’t want to see them anymore. To do this, filter for rejected photos, select them all, right-click, and choose Remove Photos. LR will then ask if you want to delete the files only from the catalog or also from the hard drive.

Step 3: Preselect candidate photos
Now I go through the collection again, more slowly, and mark the images that, at first glance, I like. In LR, you just press P (for pick). If Auto Advance is enabled, LR will move to the next photo when you select one; else you can navigate with the arrow keys.
Pro tip 3: If you have multiple near-identical shots of the same scene (which happens a lot in digital photography), keep just one. Yes, even if “this other one is also nice.” One. Uno. Eins. Pick the most representative, best-composed, or the one with that little extra detail. Take the axe to the rest and forget about them.
Step 4: Do something else
Seriously, take a break at this point. Your eyes and brain get saturated after staring at the screen for too long. Better to leave the collection and come back the next day with a fresh look.
Step 5: Rank the best photos
If the preselection worked well, from an initial 3,000 photos you’ll probably end up with about 20%—say, 500 shots. This isn’t a rule, just an average of what I usually keep: between 15% and 20%. If you’re a seasoned pro with a sharp eye, you’ll shoot less and with more precision, so your ratio may be higher. If you spray-and-pray with burst mode, you may end up under 5% because of the endless duplicates. As with most things in photography: it depends.
In any case, the goal is clear: reduce the collection to a more manageable number of promising shots.
Next, I split those preselected photos into three groups:
Keepers (the gems). Those rare shots you’re really proud of, the ones worth printing. Sadly, they’re few—around 2–3% of the entire set. In LR, these get five stars.
Good photos. Solid shots you’d happily show to friends. These get three stars.
Meh. Decent, but not impressive. They still deserve at least basic adjustments, and maybe some quick post-production if there’s time. These get one star.
You can create more or fewer groups (LR allows up to six star ratings), or use color labels if that feels more intuitive. But I find the star system the simplest.
Pro tip 4: The shortcuts for star ratings in LR are the number keys 0–5.
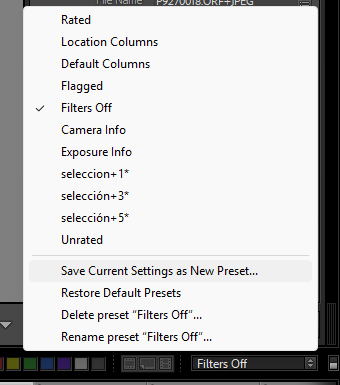
Pro tip 5: You can save custom filters in LR—for example, “flagged + five stars”—by choosing Save Current Settings as New Preset. Name it, and you’ll be able to apply it instantly in the future.
A real life example: when I came back from Nepal, I had 1,654 photos. Out of those, I selected 460 (28%). Only 46 ended up with five stars (10% of the selections, 3% of the total). Another 107 got three stars (23% of the selections), and 196 got one star (43% of the selections). Sometimes I shoot less, sometimes I select more—it varies. These numbers are just to give you a rough idea of what to expect.
Conclusion
And there you go! You no longer have 3,528 photos. You have a few smaller groups—just a couple of hundred images or less—that you can calmly post-produce if you want to. Personally, I always start with the five-star photos (developing in LR and retouching in Photoshop), and once those are done, I move on to the next group.
This workflow isn’t an exact science, far from it. I often reclassify photos, deselect, reselect… it depends on what the collection asks of me. But in broad strokes, this is how I edit. I hope you’ve found some ideas here that you can adapt to your own process. And if you feel like sharing your approach with me, I’d love to read it.
Notes:
The header illustration was generated with Sora AI.
This article contains no affiliate links.