How to backup your photos while travelling
In other posts on this blog, I have repeatedly mentioned that backing up your photos while traveling is essential to avoid (very) nasty surprises. The problem is that it’s a hassle: it involves traveling with "something" to dump your files into. That "something" is usually bulky, like a laptop. And, let’s be honest, who wants to take a laptop on vacation?
Today I want to propose the method I use because it works, and the "gadget kit" required is small and very lightweight. Obviously, it’s not the only way, but if you’re looking for a simple, fast, and portable solution, keep reading.
What we need is a way to take the camera card out every night when we get back to the hotel, connect it to storage, and quickly dump all the day's photos without needing lots of cables or weird software. Got it?
So, the system components are as follows:
Data source: The camera card. Obviously.
Data destination: A portable hard drive, ideally an SSD because they are light, fast, and low-power.
The "Computer" to move the data: Your phone.
The "Control Center" to connect it all: A hub.
Optional but highly recommended: A stable power source so you don’t rely on batteries and to prevent the transfer from cutting out halfway: a power bank.
In other words, something like this:
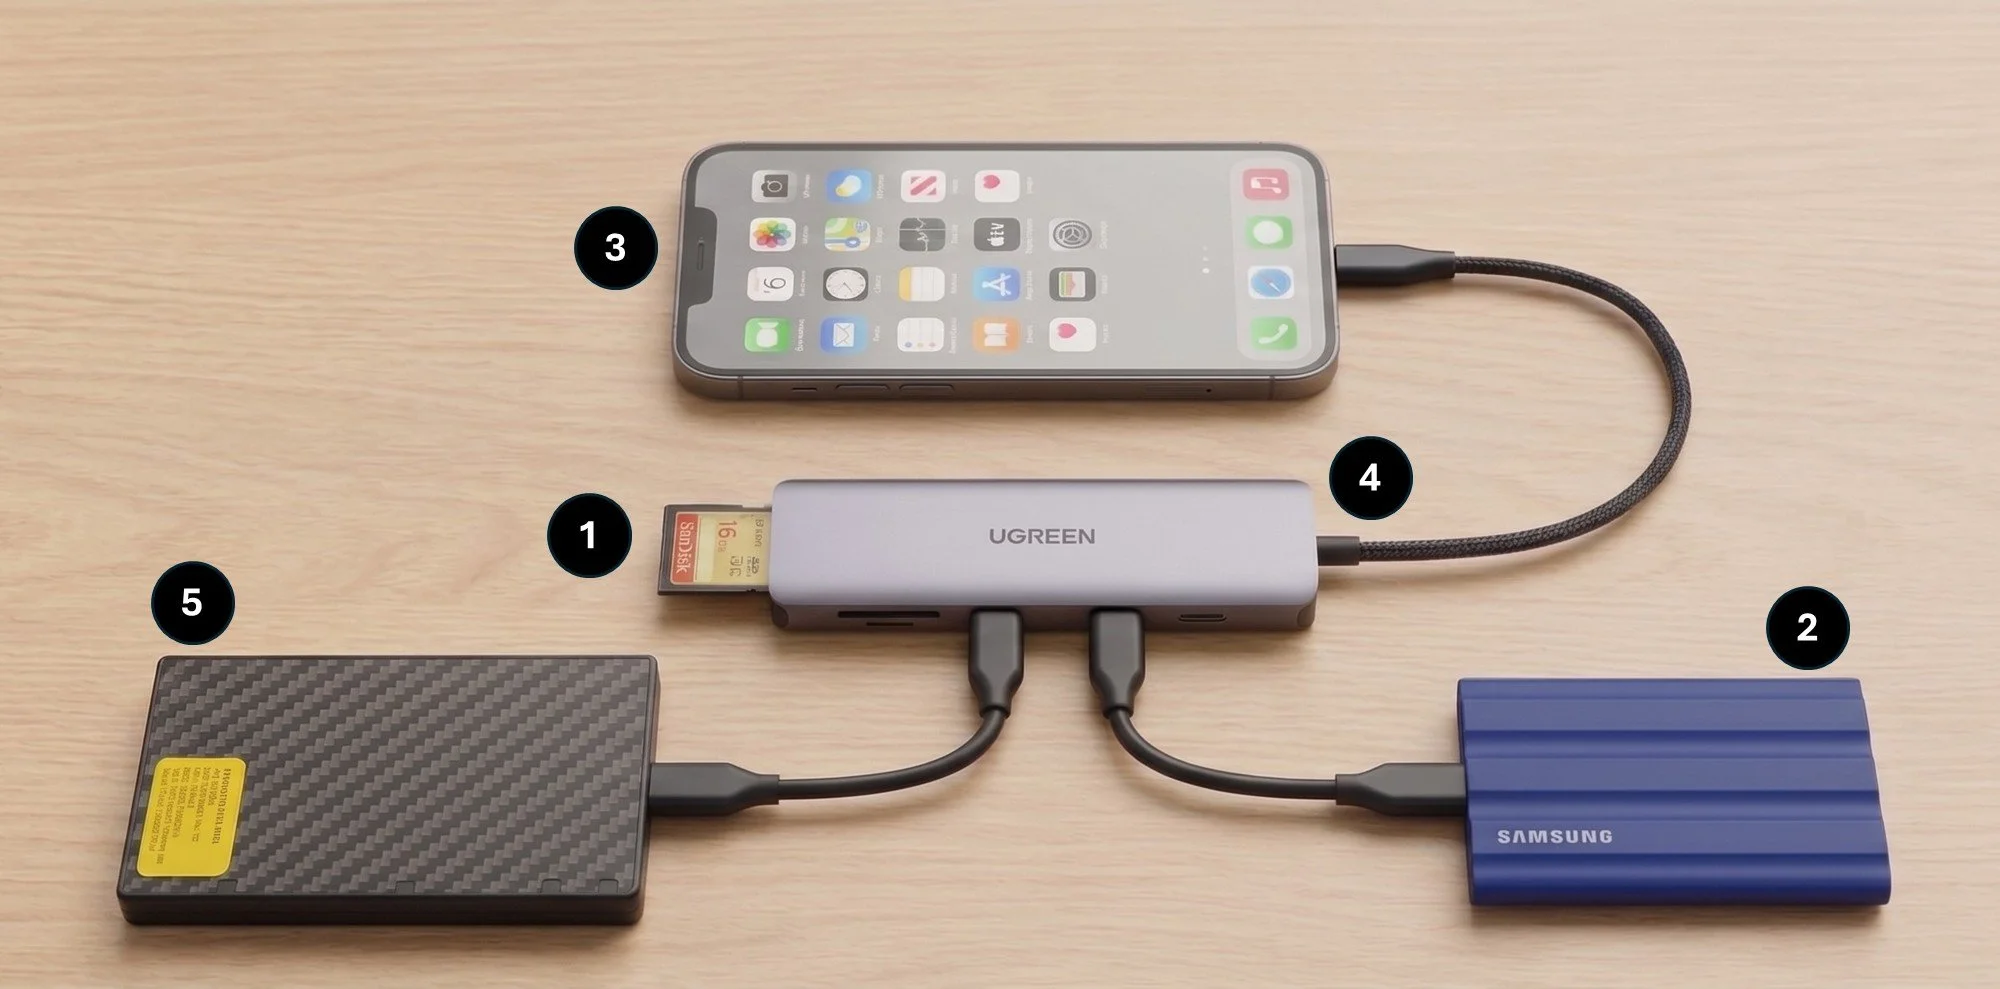
It’s that simple. You just connect each element to the hub. The order doesn’t really matter, but this is how I do it:
I connect the power bank to the hub's USB-C input marked as “PD” or “Power Delivery” (sometimes it has a lightning bolt icon). My power bank turns on automatically; if yours doesn't, turn it on. Now we have power.
I insert the SD card into the corresponding slot on the hub.
I connect the SSD to another of the hub's USB ports.
Finally, I connect the phone to the hub's output cable. It’s not the same as connecting it to any of the other free USB ports. The "fixed" cable on the hub is called the upstream cable, and it’s designed to connect to the "operations center" (usually a computer, in this case, the phone). All the other ports (downstream) are for the peripherals we connected in the previous steps.
If everything worked, two external storage units should appear in your phone’s file management app (My Files on Android, Files on iPhone): one will be the card and the other the disk. Something like this:
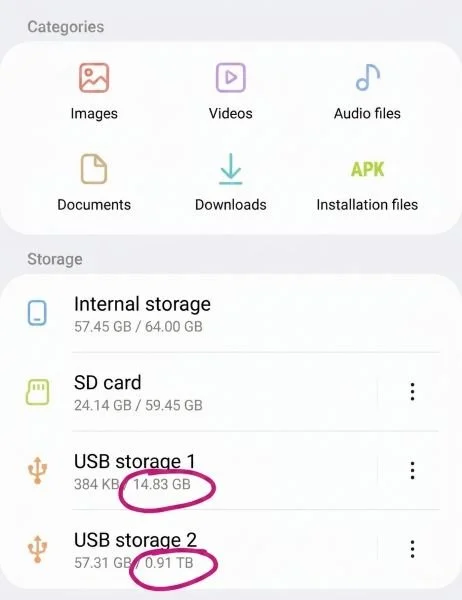
If you look closely, even though both the card and the disk appear as “USB Storage,” they are easy to distinguish by their size. In this example, I was using a 16 GB SD card and a 1 TB disk.
Now all that’s left is the file transfer. This isn't hard, but you have to be careful. The steps are:
Navigate through the card's folders to find the day's photos (easiest by date), select them all, and press “copy.”
A prompt will appear to choose where to copy them. Now go back to the screen showing both storage units and enter the disk's folders. I create a subfolder for each day with the date, but you can also just dump everything into a single folder. Either way, once you are in the destination folder, just press “copy here.”
When the transfer is finished, it’s important to disconnect both the disk and the card just in case the bits get stressed and we cause data corruption. In Android, it’s as easy as tapping the three dots to the right of the peripheral and choosing “Eject” (on iPhone, I believe you have to long-press the peripheral for the option to appear). BE CAREFUL with the “Format” option that appears right next to Eject in Android. Formatting is bad. DO NOT FORMAT.
A final note on selecting files. Since there is no mouse or keyboard on a phone, selecting "all" is fast, and selecting a single file is too, but you can't select a range—at least in Android—by just marking the start and the end. The trick is, once the first photo is selected, drag your finger to the end to add them all.
The other option is to always select all files and, when the phone asks during the transfer if you want to overwrite existing files, say "no." This will only work if you always dump them into the same folder, of course.
That’s it. You’re done. The whole kit fits into a small case that you can leave in your backpack until the next day.
To finish, here are the links to the devices I bought back in the day. To be clear, there are many more options; everyone should choose what suits them best.
Hub: UGREEN Revodok 1071. It’s fantastic. It has all the connectors I need and more. Reliable and small. Highly recommended. Note: when you buy the hub, make sure it has the correct connectors. For example, if your phone still has a micro-USB or Lightning port get a new phone already, check that the hub is compatible. The same goes for cards. SD is the most used format, but some brands (hello, Nikon) have models that only have a CFexpress slot.
SSD: Samsung T7 Shield. I like it because it’s tiny and comes with a silicone protector, which is very useful in case of accidents.
Power bank: Nitecore NB10000. I think this model is discontinued, and there’s a new version on the market. Actually, there are a thousand brands of power banks… Nitecore has a good reputation, and this one specifically is very compact.
Notes:
This post does not contain affiliate links.
The opening illustration was generated with Nano Banana AI. The backup system diagram is also a photorealistic AI generation based on my own devices. The phone image was also AI generated from a screenshot of my Samsung M31, which is in Spanish.